Monday, February 3, 2014

DIY Pillow #2


The sweater pillow DIY is so easy, affordable and fun! It can be done in a day and for less than $20! I hope your ready for an adventure! Follow the steps and tips and you'll save a bundle on these warm pillows!

Supplies:
1. A sweater. Boyfriend or husband got one he won't wear with tags on it? Perfect! If not, check out the local thrift store! You can find some with tags still on or gently worn. 

***tips: make sure the sweater isn't stained and doesn't have an piling! Check for holes and overworked armpits. Make sure the sweaters allow enough material for your pillow. You won't want to use children's sweaters for this project!****

2. Scissors

3. Needle and thread. Sewing machine if you've got one! Makes the project zip right on by! 

4. Preform pillow [I chose a 12" x 12" and 18" x 18" for the pillows I made!]

***tips: preform pillows are the best choice for this project. They'll save you time and heart ache. Allowing the pillow to last longer and an easy template for making your shape. Plus an extra layer of protection from tearing and loose stuffing! 

5. Straightedge or ruler 


I chose to make two sweaters for this DIY! You'll see similar patterns but the same idea applies for any sweater!

Let's get started! 

1. Lay out your sweater on a flat surface and check for any problem areas you may want to remove.

2. If the sweater has a waist band similar to the one I chose cut it off (use the straight edge to create as straight an edge as possible to make it easier for sewing later.


3. From arm pit to arm pit create a straight cut removing the top half of the sweater.


4. You'll be left with a straight band of fabric now! Measure your pillow with the fabric. For this project you'll actually want your fabric a bit smaller than the form as the sweater material will stretch to fit the pillow preform. 

Measuring the width as well as height cut off one side leave the other still attached to its original seam. [woohoo for less work for you!]


5. Sew away! Three of the four edges will be sewn 100% together. The fourth edge you will sew about two to three inches in, leaving enough room to slide the pillow into the form [see second photo below]. It takes a little muscle but as long as your seams are strong it won't tear! (Good test for later!)


6. Hardest part (in my opinion) hidden seam. If you've never done a hidden seam in highly recommend heading to YouTube and watching a handful of tutorials before jumping in. In this step you'll be closing the seam on the bottom of the pillow! Use thread in a similar color to help keep the seam hidden and voila! You just made yourself a sweater pillow! Now it's time to test it with a good movie and a nap for reward! Enjoy!


Sunday, December 15, 2013

DIY Watercolor Pillow

A very good friend of mine has a pillow obsession. So for this holiday season I've decided to take it to the next level. She sends me photos of beautiful pillows from time to time and I often think, there's no reason I couldn't make those.

Fast forward a few months and it was time to test it out. After some research online I've discovered there are plenty of websites with instructions on various pillows. I found this site and adore the instructions [very thorough] and decided to take it for a spin. [website: brit and co! check them out for more DIY ideas this holiday season!]

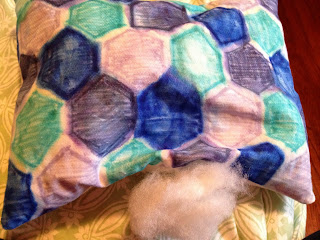
A watercolor pillow seemed ideal - no standards of perfection, as they are meant to be creative and whimsy. After collecting my sharpie collection [Yes, I agree I do have a problem. I can't help it, all the colors need love and I'm willing]. I ran to the local fabric store to pick up a few other supplies. You can also just purchase a plain white cotton pillow, but I decided to hand make mine for multiple reasons. Mainly my enjoyment of sewing and making sure it is well constructed and fluffy. 

The supplies you'll need:
Sharpies. I always say stick with brand name when trying something new - it's far less stressful and you know other people have tried them.

White Cotton - You can decide on the size pillow you want. I purchased a ton of extra to make gifts for others as well. 

White Thread - I always buy coat thread now, it's my favorite for it's durability. 

Rubbing Alcohol. 

Now here's where I've modified. They say use a Q-Tip, which I suppose would work for detail designs but I've made a large print and purchased a super cheap paint brush to just brush on the rubbing alcohol and let it soak through to create a stronger effect.


Step Two: You've got your supplies all collected and you're ready to start! My first step was to do some experimenting. I wanted to see how the colors blended with Sharpie and pick a scheme. Plus it's just fun to practice and see where your talents lie. 

I cut little strips out and grouped my colors [yes I'm a bit obsessive about them being grouped]


For the small strips I used Q-Tips for practicing, the scale was smaller so the brush wasn't necessary. 

*** RECOMMENDATION: Put paper underneath your working surface. The sharpie WILL BLEED when you draw and especially when you add the rubbing alcohol. ***

 Step Three: PLAY!


Step Four: Once you have your design selected, cut your material to the size pillow you would like plus 1" for sewing - I always prefer to leave more fabric then less - you can always take away.


Step Five: I got a little ahead of myself and started playing with the rubbing alcohol to be sure I liked the outcome, but go ahead and fill in your pillow and then brush on the rubbing alcohol. 


Step Six: I chose to add more structure to the pillow so I put a layer of muslin behind the cotton and iron on interfacing. Then sewed together the two sides of the pillows. I wanted the pattern to only be on the front side instead of both sides. 


Step Seven: Stuff it! 


Step Eight: Play some more! You know you want to! 


Here's my final product. I'm quite pleased with it! 


Tuesday, December 3, 2013

Spreading the Cheer!

Hello all! 

I wanted to post a few of my favorite style worthy design sites for Holiday gifts!

For a little bit of everything:
uncommongoods.com 

For your creative counterparts:
Blick Art Materials, which recently teamed up with Utrecht for those of you who missed the news!
Etsy.com
Factory43 offers amazing prints at affordable prices

For Detroiters! Noel night Saturday offers art at affordable prices, pieces made by students and alumini are for sale each year at the college for creative studies!

The staples:
Anthropologie.com
Macy's is great for friends who are moving into their first new homes
BHLDN for the engaged couple you know! 

If you are still lost on your holiday gift needs feel free to send me a message! Gift giving is a specialty of mine! 

Saturday, November 30, 2013

Updates! and lots of them!

Well let me start by saying I'm sorry! I started a new job and fell off the face of earth, but I'M BACK!

I've been busy working but still managed to find time for a few fun projects. We'll start with the most recent.

Project One:

Halloween, I'm crazy for it. This years costume was Sherlock Holmes. Which of course is next to impossible to find in stores - especially when you are a female. So I decided to embrace my creative side and make my own. I started out drawing a template out of newspaper and in the end I'm thrilled with the results!

Here's the process in photos: [I'm missing a few but I'll explain them!]


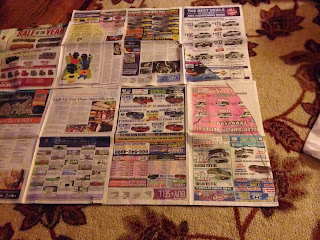
Step One: Taping the newspapers together into a much larger sheet - I used about 6 sheets that overlapped. Make sure the overlaps are taped down good or it will cause a headache later. You most definitely need to be gentle with the newspaper - it tears easily but it will serve it's purpose. 


Step Two: Using a bit of string, measure yourself - I started at the base of my neck and went to just past my wrist [remember some of the length will be lost when you sew]. Then take the measured bit and find the center of the newspaper. [You may need an assistant for this portion] Hold the string in place and create a circle from the opposite end of string. 


Step Three: Cut the circle you've drawn out of the newspaper. [I also double checked my circle by folding the newspaper in quarters so I knew it was a true circle before I moved onto the fabric - it's much cheaper and easier to remake this portion rather than that fabric portion of the project.] I folded my fabric in half to keep the integrity of the fabric design and then seamed the center of it back together. You can pin the newspaper to the fabric to be sure you cut true to your template.


Step Four: Once you've cut the fabric out remove the pins. [If you are seaming together the two pieces be sure to keep them pinned together and sew this part now]


Step Five: I chose to finish the edges with binding tape to give a more finished appearance. It is time consuming and you have to pay close attention or you'll slip of the small seam and have to start over but it's entirely worth the extra effort.

Step Six: Using the cape in it's current form you'll want to measure the space where the collar will be - you'll need to cut a little larger than you measure so when you sew there's enough material. I also chose to use the binders tape on this portion as well. Leave an extra long piece of binding tape so you can tie your cape together. 

Step Seven: Sew your collar to your cape! 

I chose to dress up my sherlock outfit and wear a dress out with black boots. I purchased the cap at Party City and magnifying glass at Home Goods [Something fun I can put out all year]. I also chose to purchase a faux pipe at Party City and black gloves [not pictured]. Black tights and boots finish off the look! 


Project Two:

Pumpkin Sculpting! A few years ago my brother came home from college after having met Ray Villafane. A famous pumpkin carver [whom I had no expectations to come close to being able to sculpt like but check out his work for inspiration and to see what hard work and practice can get you!]


Find some inspiration. I started with this but changed my mind after a little googling. 


Peel the skin off the pumpkin - this for me is the hardest part. Pumpkin skin is tough and you'll want a fairly sharp tool. I bought a set of pumpkin tools at Target and found a good fit for myself in the kit. Most tools used are ceramic tools. Which you can find at Michaels [and use a coupon!] and get fairly cheap. My set was $10 and I used a 40% off to get it to $6 and some change. 


The most important steps involve remembering the nose will be the highest point. So you'll want to avoid taking out too much pumpkin from these areas. 


[I never carve alone! This year my two brothers and neighbor joined me! I'll show their results too!]


I wanted to give my pumpkin a humorous face so I chose to make him a bit lop sided and chubby. 


I also wanted to have an open mouth - so I carved all the way through. You don't have to do this - in fact it speeds up the rotting process if you do!


It's important to keep the pumpkin wet - when it begins drying out it starts coming apart in larger chunks and can ruin all your handwork! 


Another assistant! ;) 


Here's my results! 


And the boys!
Matt Byle:


Billy Byle:


Austin Simmons:


I'll post more projects when I get a bit more free time!

I started a new blog for anyone looking for help with color:

http://colordesigning.blogspot.com


Tuesday, February 28, 2012

Math, Science and Plants!

LOVE IT! I seriously adore learning any neat tricks involved with drawing, math, science or art and could think of nothing better than this video my boss shared with me today! Even if your not interested in half of those things, it's still a great video! CHECK IT OUT!


http://youtu.be/ahXIMUkSXX0

Sunday, February 19, 2012

Color Play

So, I want to re-vamp my "Brand" or resume packet. I've decided to really indulge in my personal favorite things to create a new personal branding image...

I thought I'd share what I've got so far.

I've just begun building it so bear with me, but I am fascinated with a few ideas so far.

1. Crystalized Rock formations - just always been interested in their forms and the subtle changes within each formation.

2. Shades of purple, it's where warm and cool meet. Blue and Red, opposites attracting to create this never ending collision of shades and hues of my favorite color.

3. Mandalas - this is still something I'm working out on the form so far, but I've always been intrigued by these endless circles of color, form and design. Since I was young I've begged my mom to buy the more expensive mandala coloring books for me and skipped past the simple teddy bear puzzle, cat with a scarf, bunny hugging a turtle options.

4. Culture. I'd love to find some way to introduce my love for culture into this piece, especially language. I've always had an affinity for learning new languages and indulged in the opportunity, for instance - at one of my jobs we have a Korean woman [really lovely lady, so sweet and caring and such a hard worker. She's much older but has such enthusiasm for everything. She's been teaching me little words in Korean as well as introducing me to some less than well known foods, such as fish cakes [which are fantastic by the way]. Or learning French at the creperie I worked for. 8 years of spanish classes, or a Portuguese room mate. Nothing makes me happier than hearing the different cultures and how things are done so foreign from what I grew up with.

5. Nature. OBSESSED. Garden admirer, tree planter, seed sower etc.

6. I'd also love to introduce my love/hate relationship for food into this mix. Still not sure if it's possible without bombarding information.

I'd like all these points to be subtle - it shouldn't scream in your face, but rather whisper in your ear. It's another piece of my own personality that I'd like included. I'm subtle, and tend to be soft-spoken. Non-abrasive and always learning. Don't get me wrong. I have another side that comes through from time to time in the right company, but for the main parts I tend to lean towards my comfort zones of quiet and peace.

I'd like to give some information upfront, but mostly I'd like the piece to be something easy to look at and intriguing.

So here's the start:


Still working out the font, placement and adding much more but to give you a bit of insight in the process I wanted to share a few of the steps along my way of discovering a brand image for myself. 

Monday, February 6, 2012

I'm obsessed

With super funky abstract colorful textiles. I don't know what I would do with any of them, but I WANT to make them all.

While doing some circuit training today, I ended with a nice round of yoga. Nothing to crazy so - I decided to make it more interesting. Drawing & Yoga at the same time = inspiration! Who would have guessed! I look forward to some more sketching tomorrow and will post some photos of what I've been working on soon! Going on a bit of a pattern making stint here and hoping to find some cool ways to apply these ideas.

I'm also hoping to come up with some lighting designs and build them throughout the spring. I want to explore this more. I'll be doing a lot of research on lighting design and textiles and posting my findings here for all to share!

Maybe screen printing & lighting design in some form.