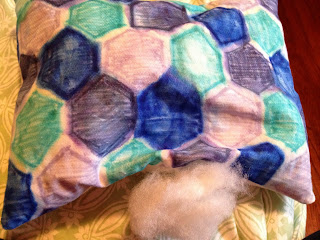
A very good friend of mine has a pillow obsession. So for this holiday season I've decided to take it to the next level. She sends me photos of beautiful pillows from time to time and I often think, there's no reason I couldn't make those.
Fast forward a few months and it was time to test it out. After some research online I've discovered there are plenty of websites with instructions on various pillows. I found this site and adore the instructions [very thorough] and decided to take it for a spin. [website: brit and co! check them out for more DIY ideas this holiday season!]
A watercolor pillow seemed ideal - no standards of perfection, as they are meant to be creative and whimsy. After collecting my sharpie collection [Yes, I agree I do have a problem. I can't help it, all the colors need love and I'm willing]. I ran to the local fabric store to pick up a few other supplies. You can also just purchase a plain white cotton pillow, but I decided to hand make mine for multiple reasons. Mainly my enjoyment of sewing and making sure it is well constructed and fluffy.
The supplies you'll need:
Sharpies. I always say stick with brand name when trying something new - it's far less stressful and you know other people have tried them.
White Cotton - You can decide on the size pillow you want. I purchased a ton of extra to make gifts for others as well.
White Thread - I always buy coat thread now, it's my favorite for it's durability.
Rubbing Alcohol.
Now here's where I've modified. They say use a Q-Tip, which I suppose would work for detail designs but I've made a large print and purchased a super cheap paint brush to just brush on the rubbing alcohol and let it soak through to create a stronger effect.
Step Two: You've got your supplies all collected and you're ready to start! My first step was to do some experimenting. I wanted to see how the colors blended with Sharpie and pick a scheme. Plus it's just fun to practice and see where your talents lie.
I cut little strips out and grouped my colors [yes I'm a bit obsessive about them being grouped]
For the small strips I used Q-Tips for practicing, the scale was smaller so the brush wasn't necessary.
*** RECOMMENDATION: Put paper underneath your working surface. The sharpie WILL BLEED when you draw and especially when you add the rubbing alcohol. ***
Step Three: PLAY!
Step Four: Once you have your design selected, cut your material to the size pillow you would like plus 1" for sewing - I always prefer to leave more fabric then less - you can always take away.
Step Five: I got a little ahead of myself and started playing with the rubbing alcohol to be sure I liked the outcome, but go ahead and fill in your pillow and then brush on the rubbing alcohol.
Step Six: I chose to add more structure to the pillow so I put a layer of muslin behind the cotton and iron on interfacing. Then sewed together the two sides of the pillows. I wanted the pattern to only be on the front side instead of both sides.
Step Seven: Stuff it!
Step Eight: Play some more! You know you want to!
Here's my final product. I'm quite pleased with it!


